
So in the previous part, our comp is in AE but it's looking bright. I thought I'd take a moment for us to look at why this is happening and how to fix it.
You'll notice from the previous post that the multipass looked very odd when looked at in AE. That's because of one major reason: Cinema 4D uses a Linear Workflow.
In order for it to work as we need, we need to tell After Effects to work in a linear mode, as well as be 32 bits per channel (since our OpenEXR render is 32bit);
Remember the compositing file we saved last time? We'll use that to import our render into AE.
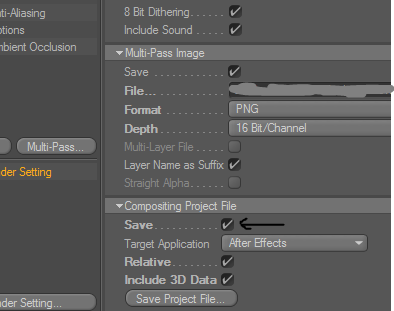 |
| If "Save" is on, the compositing file is saved in the same folder as the beauty pass. (Main save location) |
The compositing file is very useful because:
- Your composition has all the properties applied; ie Comp Size, frame rate, pixel aspect ratio, duration etc.
- It brings in the Camera and all its animation. If you were compositing into live-action, this is extremely handy;
- It brings in all lights in the scene in their exact position with any and all animation applied. Haven't needed to use this before but it wouldn't hurt to have that information (especially if you're using CS6); This is also great for Optical Flares.
- All your passes are brought in and comped as required. Your diffuse+specular+shadow will be put together and set to their required blend modes, so you don't have to worry about it. Another advantage is that ALL separated lights (in Multipass) are saved in their own comps (ie already precomposed).
- Object Buffers, UVWs, Motion Vectors and any other pass that doesn't go into the beauty are automatically added in the Projects Panel in a folder "Special Passes". Nice!
Basically, you have your entire 3D scene fixed nicely into After Effects.
Bring in the Scene
Start in an empty project then go File > Import...
From here, we can navigate to where we saved the compositing file which ends with .aec extension.
(I rendered only one frame for this demonstration. In movie cases, each image comes in as a sequence);
You'll notice how nice and neat everything looks. We have all the EXR sequences brought in, organised and composited.
(Keep in mind, if you have a big project, you can import all the .aecs to have all your compositing in one file :D)
Now, what we're interested in is the "Multipass_Compositing.c4d" folder (it's named after the project). Open up the composition that shares the same name as your project. Feel free to rename if you have to, but I don't see a need.
Now things look a bit too over-exposed for me, let's see what's going on:


I switched off the lights, but that didn't do anything because the layers are actually 2D. A closer look reveals that I have "frame_0090.exr" at the bottom has the lights passes (Pass_Ambient, Pass_Fill, Pass_Sunlight), being added on top. That's not good.
This is because the Compositing file was saving the file as if we had the diffuse-specular-shadow setup as we did in the first part. Remember, we removed those because they were blank and would just take up unnecessary space. So, we need to compensate for that decision by changing the BOTTOM layer to "Normal".

Okay, that's made things slightly dimmer, but we're still looking too bright. Maybe it's our bit depth. I changed it to 32bpc (Ctrl+Click on the 8bpc at the bottom of the Project panel). But that doesn't appear to have helped.
The solution lies a bit further away, so let's take a look at...
LUT and Gamma
A Look-Up Tables are how software DECODE an image. How they determine that a set of 1s and 0s is red, or red-orange. This is also very closely related to gamma. Different LUTs produce slightly different images in terms of contrast, brightness and saturation. It's a bit like the CMYK and RGB differences.
So, HP and Microsoft came together and created the sRGB LUT, which is used by almost all monitors and devices this day. After Effects uses this as the default LUT.
And then there's Linear, which is actually the default in Cinema4D and Nuke. Linear supposedly looks more natural to the eye, so you wonder why we're not using it as the standard. Well, it has its drawbacks. You can find a longer and more broken down explanation of all this on this CreativeCow tutorial.
So, AE is at sRGB (or Gamma 2.2) but it's receiving linear files. So we need to change AE to go into a linear space (check out the link above, it's quite a read).
Go to File > Project Settings
 |
| ( Click to view larger ) |
Under "Color Settings" set Depth to 32 bpc, then check "Blend Colors using 1.0 Gamma". Working Space remains as None.
You'll get a notice at the bottom of the page saying some pretty interesting stuff. Of note is:
Color values will be temporarily converted to linear light from sRGB (approx. 2.2 gamma).
So that's exactly what we were looking for. The alternate option, btw, would be to set Cinema4D to sRGB, but I think it's better to do it in After Effects.
So, click ok and take a look:

Cool, now everything looks just right. There's also the fringing around a few edges that got fixed (yellow cube on the right especially);
Okay. So this post proved to be a lot longer than I would've liked. In the final post, we'll look at what we can do now that everything in AE is ready :-D


