
Hello creative people!
So I have been working on my modelling in Cinema and I thought I'd share a few things, like where I got the references, and hopefully I can psyche you up to get going as well.
So I went looking for references, schematics and blueprints for anything interesting I could find... then I found this:
 |
| XWing schematics via blueprints database |
BAM!
How happy I was. In case you missed it, this schematic is from Star Wars.
I got it from a cool site called The Blueprints (http://www.the-blueprints.com) and they have a HUGE collection of blueprints and schematics!
I got it from a cool site called The Blueprints (http://www.the-blueprints.com) and they have a HUGE collection of blueprints and schematics!
 |
| My Xwing |
So yea, I went ahead and modelled the Xwing, though I added my own adjustments, like my version of the x-wing.
This was REALLY FUN!
For those of you about to visit Blueprints, check out the details it has per blueprint. Like what views they have (front,top,side etc) but mostly check the resolution. Some images are tiny!
Setting up the scene in Cinema4D
This part for me was mostly trial and error, and I eventually got something that works, so I thought I'd save you and share it with you.
Honestly I had no psyche to start chopping up the image in Ps and saving separately, though I did face a few problems with scale later on.
Also, this may be a long process, but you only do it to one plane and then you can easily duplicate to set up the other planes. You'll see!
Setting up the references
Create a new material and in the Color channel, apply the image to the texture section, then switch off Specular:

We'll start with the top view.
Create a new plane and set subdivisions to 1 x 1. Apply the material to it.
Select the texture tag in the Objects panel then set the Projection to Flat. (the material will most likely disappear)

We're going to have to scale/reposition the texture to fit the plane. However, the plane is a rough estimate, and scale is very important (for lighting and simulations) so what I'm actually going to do is create a cube at 1000 x 200 x 500 that will represent the object.
I'll then scale the plane up to be slightly larger than the cube (1200 x 700)

Next, go to Texture mode, then use the rotate tool and rotate the pitch of the texture (white cube that appears) by 90 degrees on the Red axis.

Cool. Now we'll hide the cube and scale and position to fix the top view...

Before we set up the other projections, there's a problem:
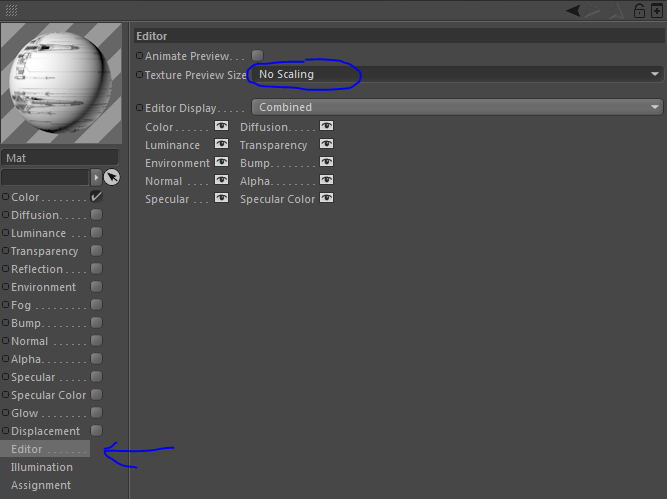
The texture is VERY blurry, we can't see any detail. And we also have an extra setting we need to add.
Go into the Material settings and in the "Editor" section at the very bottom, set "Texture Preview Size" to "No Scaling".
Notice now in the viewport, it's a lot sharper!
Now, let's right-click the object and go "Cinema4D Tags" then apply a "Display" tag. In the tag, check "Use Backface Culling" and check the first box with Gouraud Shading.

Gouraud Shading checkbox means that even though we change the shading in the viewport to, say, wireframe, the reference plane will still be visible as Gouraud shading (won't go to wireframe). So we can still use them to model in any shading mode.
Backface Culling means if we're looking at the plane from behind, it won't be visible. With this plane we've just created, we wouldn't be able to see the BOTTOM of the xwing, so with this we can view it from below because the plane will be hidden (since we're viewing from behind). This is handy coz we can even create a cube of schematics and it won't be covered.
So we're done setting up.
Let's duplicate the plane and rotate and reposition the texture. Be sure to get the centre of the xwing to the centre of the plane. We only need three planes: Top view, side view and back/front view. Here's mine:

Cool! Finally, keeping things neat, Alt+G to group the references and then set the bottom traffic light of the null to red so we won't see the references in render.
I know I know, it was one hellova long process, but it's the optimum way to work. When you get started... you'll see.
Anyway, get modelling!! Share your creations and we can compare notes :-P
Do you know a better process of setting this up? Feel free to throw it into the comments section!