Layers make Photoshop what it is, and learning and mastering them really helps artists get that edge and create flexible creations.
Layer Styles are perhaps the next step. Welcome to this Photoshop tut on how to use Layer Styles.
What are Layer Styles?
The Adobe Help document says this:
Photoshop provides a variety of effects—such as shadows, glows, and bevels—that change the appearance of a layer’s contents. Layer effects are linked to the layer contents. When you move or edit the contents of the layer, the same effects are applied to the modified contents
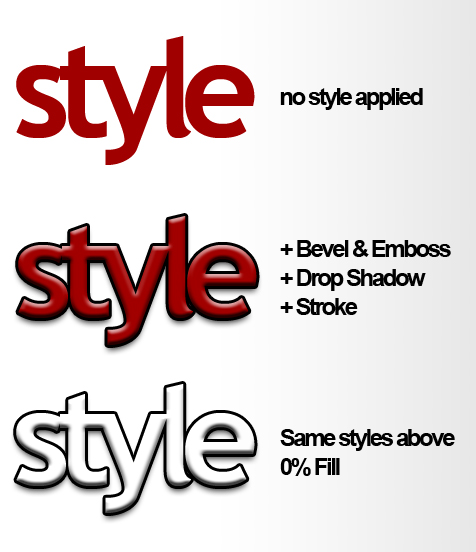
Layer Styles are basically realtime effects applied to layers and add stuff like drop shadow, bevel and so on. For example, here is a text that uses layer styles only to add the effect:
Layer Styles generally use the transparency or the edges of the layer as source points for the effects. So you can't apply Stroke to a layer that completely covers the document and expect to see something. The other thing you'll
How do I get Layer Styles?
There's a few ways to access layer styles.
1. Double-click a layer (anywhere in the layers pallet other than the name, because then you'll rename it). (double-clicking the thumbnail works only on rasterized layers).
2. Go to Layer > Layer Style > and choose a style to apply.
3. Click on the fx button at the bottom of the Layers pallet and choose a style to apply.
Whichever process you choose, you'll get the Layer Style window:
I'm on the Drop Shadow page here.
I won't go through all the controls (coz then I'd ruin the fun of experimentation) but I'll give you some heads up on working with some controls and important stuff:
1. Styles. Check an effect to apply it, uncheck to remove it. Click on the name to view it's properties. Please note that checking won't automatically select it to view controls.
2. Effect properties. At the top would be the name of the effect with more sections below. At the top would be Structure (in some) and the first control always seems to be the Blend Mode and Opacity of the effect! Yes, effects can have different blend modes, which is quite useful but can also be rather annoying. If you're layer is set to, say, the Difference mode and you want your styles to conform, you'd have to set their modes to Difference as well.
There's also some controls that I'll explain in a bit.
3. Preview box. The preview box uses a gray square and applies the layer styles to it for a demo, just in case it's not very visible in your actual layer. The "Preview" checkbox above it applies to whether you want your layer to view the effect, it doesn't affect the box.
4. New Style... This button lets you save what you've done as a preset so you can access later via the Styles palette.
So how do I use Layer Styles?
I can't be the one to tell you that, you'll have to figure it out yourself.
Though I can tell you that Layer Styles are great at adding 3D to text and layers and making them look dynamic! Also, one great way to mess around is to create a new layer, add layer styles, and just brush your ass off all over the place and watch it update with each stroke. Awesome!
Something about stuff we should know...
Oh yea:
1. Global Light.
You'll find Global Light in all effects with some sort of 3D effect to them. That is Bevel and Emboss, Drop Shadow and Inner Shadow.
Global Light is basically a universal light source that affects these effects, you know? It comes in handy because it helps each style conform to the entire composition. Yes, Global Light affects ALL layers.
So, if I created another 'styles' text and applied Drop Shadow at 45 degrees, then added 'layer' at the top then applied Inner Shadow at 60 degrees, the styles layer's Drop Shadow will change it's angle to 60, to conform, however you should note that when I was creating the Inner Shadow, it was already set to 45 degrees! When it comes to Bevel & Emboss, the value of Altitude is used as well.
If, for any reason, you wouldn't want this specific style not to be affected by Global Light, just uncheck the Use Global Light switch. The control will reset when you do, but checking it again puts it back in sync with the Global Light.
(thought I'd add layer styles to the labels as well)
2. Fill & Opacity
If you've always wondered what the difference between Fill and Opacity was... this is where it comes in.
Opacity (in the Layers pallet) will affect the entire layer including its styles, where as Fill only affects the layer that's producing the effect, and leaves the styles as they are. Like this:

This is pretty nifty because if, say you wanted to apply the same style twice but with different options, you could duplicate the layer, clear it's styles, set up the new style you want then set the new layer's Fill to 0%... oh and speaking of clearing layer styles...
3. Copy/Paste/Clear Layer Styles
If you right-click on a Layer, you get the options to clear, copy or paste layer styles, which is very handy. However, please note that Opacity, Blend Modes and Fill are included. By that I mean that if you cleared the layer style it would not only remove all effects, but also set the layer's Blend Mode back to "Normal" and set both Fill and Opacity to 100%. Same goes if you copy a layer style, all these values will be copied and pasted into the layer.
Well, have fun experimenting. Please leave any questions you may have below in the comments.


