Get started working with expressions in After Effects. No prior experience with code required, and in a few minutes you'll be ready to work on your own to create new expressions and learn how to use functions you need as you go along.
Showing posts with label tutorial. Show all posts
Showing posts with label tutorial. Show all posts
AE: Using Text Animators
The expression mentioned:
if(textIndex % 2 > 0){selectorValue}else{-selectorValue}
AE: Building a Selection Box shaped by 2 Nulls with Expressions
We'll have 2 null objects in the scene that will define the corners of a box. Just like the clicks in creating a rectangle with the marquee tool, the first null defines the origin, and the other is the direction the box goes in. Take this as an exercise in understanding how expressions work with different properties, and hey, you could learn something useful.
So, let's figure this out.
AE | Build a Monuments Timeline with Shape Layers and Expressions
 |
| Hopefully this has had enough time to load |
We'll look at how to build a never ending timeline (or scale) that you can move around to any amount without hitting the edges using Expressions and a built-in effect, how to create the counting time, fast and easy method to extract the monuments and some tips on positioning comps while animating.
All About Expression Controls
Expression Controls are effects that don't seem to do anything to our compositions! But they work as UIs for expressions we create. In this post, we'll take a look at each individual control and see what it can do and how to make use of it.
Change Multiple Comps from a Single Master Composition with Expressions
Okay, here's the scenario, an editor has created promotional material for a few shows. The channel he's working on has specific graphics that I need to make. So, I need to make, for each show, a graphic that shows the name of the show and different versions that say "Tonight at [specific time]", "Next Week", "This Week", "Coming Soon" and so on. Here's how one of them looks:
The problem is there's 6 versions and 4 shows, 24 comps in total. I can't keep rendering, changing text, rendering; it is kinda tiresome and is more prone to mistakes!
This tutorial will take a look at how to set-up your project so all you have to do is change ONE composition and create all 6 variations per show in one go. So technically, I only have to change and render 4 times, as compared to 24.
As always, this technique can be used for anything that requires batch editing and rendering, so adjust it for your specific uses.
AE | Expression Driven Gauge - Part 2
In the first post, we looked at building the base and setting up the numbers, now we're gonna make the Master control and get the bar to change colors.
AE | Expression Driven Gauge - Part 1
Expressions!! Expressions can be used to control various properties of a layer but their use if quite situational. It really depends on how you intend to use your composition. This will affect the approach you take as well as whether it's necessary to use an expression at all. I think the best way to illustrate this is to use a real-world example: a gauge!
So, we're going to make a "Core Temp" gauge as in the header above. It's pretty simple, right, but we're mainly going to focus on the decisions we make about the expressions driving the different elements that make up the gauge, and how we're going to set up the entire composition to be 'expression-friendly'.
PHOTOSHOP | Road to Home Photo Manipulation
We're gonna be using Photoshop and 4 images to create a the below photo manipulation. We'll mainly focus on blending the colors and the contrast of the different images to get the final result, the most important step. Click the title to see the tut. You can click the image to view it larger.
TUTORIAL | Jump Out of the Frame
In this video tutorial I demonstrate how to make someone jump out of the frame. This technique can be used for pretty much anything. Here's the final product:
Young girl dancing happy in a field by african_fi: http://www.sxc.hu/photo/1386581
TUTORIAL | Fix Canon EOS Utility Issue in Windows 8
Having issues using your EOS Utility application on Windows 8? Here's the solution.
I use a Canon EOS 650D and whenever I connected it to my Windows 8 PC (x64), EOS Utility would not pick up on it and all options would remain grayed out and disabled. This problem is also reported on the EOS 7D and 5D.
To fix this problem is pretty simple.
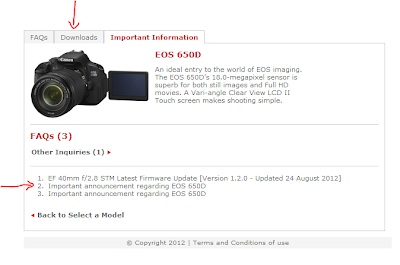
- Go to the Canon Support Page here.
- Select your camera. I'm going to select the 650D.
- On the next page, check out the numbered links below for news on your camera. Might find something important. I just learnt there's a problem with 650D's producing a white irritating substance on the grip over time, luckily their check system said my camera is not affected.
- Click on "Downloads" at the top.
- Select "Software (drivers and applications)", your operating system and select a language.
- Down below, you'll find "EOS Utility 2.12.3" (at least, at the time of this post, it may be higher).
- Read the disclaimer, then click "Accept & Download" if you accept. The download will begin.
- Install the program as you would any other program. If you already have a previous version of EOS Utility, you can proceed with installing and it will update.
- Enjoy using your EOS Utility!
- Remember to check back every few months for new updates to the software.
The real problem was that the previous versions of EOS Utility are not compatible with Windows 8. Since the software on the disk was written before Windows 8 came out, you'll have to download directly from Canon.
Enjoy :-D
TUTORIAL | Using INTERFERE on Holographic UIs
In the first of many video tutorials, I explain how to setup i2c_INTERFERE for a quick RGB-split and distort effect for this holographic UI panel.
Get i2c_INTERFERE in the Presets Pack here.
Your feedback is appreciated.
TUTORIAL | Snowflakes with Shape Layers and Stacked Modifiers
The festive season is upon us and the Christmas work begins.
As a little helper, I thought I'd share this video on how to use Shape Layers and their modifiers to create fancy shapes and snowflakes. There's also lots more you can do with this technique, but I'll leave that up to you :-D
Wait a second! Tip 32?
I've been posting plenty of tips on Facebook and Twitter! If you'd like to stay up to date, follow @i2cblog or join Ideas to Creations page. There's plenty of useful info, and feel free to share your own discoveries!!
Enjoy!
TIP | RGB-Split Black with INTERFERE
How do you RGB-split Black? Well, in this post I'll show you a quick workaround when using i2c_INTERFERE.
This post is about i2c_INTERFERE in the i2c Presets Pack. You can get it, and more info, here.
Well, technically it's not possible to get RGB from black. Because black has [0,0,0]; all values of [Red, Green, Blue] are zero. Which is why Interfere won't work with black text, but there is a way to fix this.
The above example is with black text. As the manual goes, I've renamed the layers to "RED", "GREEN" and "BLUE" and set the top two blend-modes to "Add", but the layers remain black.
In order to get the colors out from these layers, we need to use a different "formula" to calculate the color output. We do this by changing the fx_COLOR effect in the layers themselves:
Under fx_COLOR's "Operator", change it from "And" to "Or".
This will make the layers nice and colorful, back as their names are set:
One other thing, you're probably asking: Why isn't this the default?
On the left, the blacks remain black while on the right the whites remain white. So depending on your image, you can choose an operator appropriately, or choose one on the look it produces.
Though in the end, they all produce very similar images. So... yea...
This post is about i2c_INTERFERE in the i2c Presets Pack. You can get it, and more info, here.
Well, technically it's not possible to get RGB from black. Because black has [0,0,0]; all values of [Red, Green, Blue] are zero. Which is why Interfere won't work with black text, but there is a way to fix this.
The above example is with black text. As the manual goes, I've renamed the layers to "RED", "GREEN" and "BLUE" and set the top two blend-modes to "Add", but the layers remain black.
In order to get the colors out from these layers, we need to use a different "formula" to calculate the color output. We do this by changing the fx_COLOR effect in the layers themselves:
Under fx_COLOR's "Operator", change it from "And" to "Or".
This will make the layers nice and colorful, back as their names are set:
Okay, look right in the middle where the layers intersect. It's getting a strange mix of colors, but black is nowhere to be found.
The solution is simple: Change the blend-mode of the top two layers to "Multiply"... and...:
Cool! Now we have black where the layers intersect!
Well, for one, this process doesn't work if the layers are originally white. It becomes like we've swapped the problem. With these settings, white text would remain white! Also, multiply doesn't work with white.
Another thing to notice is the differences it makes with images:
Here's a comparison of the RED layer with the "Lighthouse" image that comes with Windows 7
The left is the default operator (And), the right side is the operator in this post (Or). See the difference?On the left, the blacks remain black while on the right the whites remain white. So depending on your image, you can choose an operator appropriately, or choose one on the look it produces.
Though in the end, they all produce very similar images. So... yea...
Multipass Compositing with Cinema4D and After Effects 03
So in the previous part, our comp is in AE but it's looking bright. I thought I'd take a moment for us to look at why this is happening and how to fix it.
Multipass Compositing with Cinema4D and After Effects 02
In the previous part we learnt how multipass works, now we'll take a look at how to save the passes and take them to After Effects.
C4D: Create a Studio Floor
Products, logos, blog headers or any other purpose, curved studio floors make for a nice background. They catch shadows nicely and help with Global Illumination (or Indirect Illumination), which in turn makes everything look cleaner and awesomer.
In this tutorial, we'll be looking at how to create a nice Studio Floor that's easily editable and re-usable.
Subscribe to:
Posts (Atom)


