
Hey!
So here is the long awaited i2c Presets Pack tutorial.
In this one, I'm going to be showing you some cool, advanced uses of the Presets. I'm currently using INTERFERE 2 BETA for this, but you can still use the one that comes with the Presets Pack, since it's essentially the same.
We're also gonna look at how to get the object to jump around the screen like that.
Let's get started!
Difficulty:: Intermediate
Requirements:: i2c Presets Pack or INTERFERE 2
Time:: Not too long
INTRODUCTION
If you've already used Interfere, you'd know that it's an RGB-split effect with various sub-effects.
One thing that can sometimes be restricting is the fact that it applies to the entire layer uniformly, and cannot actually interfere only part of the layer.
With a bit of messing around, I came up with this technique to pull it off using track mattes, fractals and some very basic expressions.
STEP 1: Prepare
-Create a new comp. Nowadays I use 1024 x 576 at 30fps.
-Import the necessary footage. I'm importing the Feel the Void logo.
-Place the image in the new comp. (press Ctrl+Home to ensure it's centered)
-If logo is too big, scale to fit appropriately. There should be descent room around the edges.
This is going to be our source. So, in order to be able to tweak this in the future (which is very important especially for something like this) we need to precompose this image.
So go Layer > Precompose and Move all Attributes. Call this "SOURCE" and click OK.
All right, we have one layer, a precomp, and we're ready to continue.

STEP 2: Setup Interfere
Okay, I guess we're ready to go.
Apply Interfere.
-Create a new null and name "Interfere"
-Go to Effects & Presets and type "Interfere"
-Apply "Interfere_Layer" to SOURCE (v2) or "0 Layer Core" (v1).
-Press ENTER and rename Source to "RED" then duplicate twice and name copies "GREEN" and "BLUE". Set blend modes of GREEN and BLUE to Add.
-Apply "Interfere_Null" to the null (v2) or "1 Core" (v1)
Now, this current comp is going to define what the interfered parts of the isolation will look like, so we need to decide what we'll use.
I don't want to complicate things so I'm going to set it up as such:
-DISTORT - Type 8 (Noise) at 90 degrees.
-MOVE - Horizontal Move only at 10.
-SCALE - 15 amount, uniform.
Remove Interfere keyframes and set 15 and Freqency to 10. This is standard and works best for me:

Cool!
So far so good.
STEP 3: PREPARE THE MATTE
We're going to use a fractal for the matte that will separate the clean logo from the Interfere'd one. So, create a new Solid (color doesn't matter) and apply the Fractal Noise effect.
In the settings, go into the "Transform" group and switch off "Uniform Scale", then set "Scale Width" to 10000, and "Scale Height" to 150.
Alt+Click on the Evolution and apply "time*200" in the text box.
We get streaks across the screen. Nothing awfully fancy but it should get the job done.

((You could also use directional blur with a very high value to do this))
Next, we need to get rid of the greys. If we're going to use this as a matte, the greys will bring in semi-transparent areas that we don't want.
Apply the "Posterize" effect!
Set it's value to "2".
This will kill all channels and only leave two: black and white.

Great! So we can now use this as a Matte to cut the clean and interfered versions.
STEP 4: Apply the Matte
Okay, let's get this stuff to work.
-Select the fractal and precompose it to "FRACTAL". Move all attributes. We need to do this because will need a few instances of this, and also for future changes.
-Select the layers that are used to interfere (the null and the RGB layers) and precompose them as well. Name the layer "Interfered". This clears out the clutter, and also simplifies the next sub-step.
Select the "Interfered" layer and Toggle Switches/Modes and set the TrkMat (Track Matte) to "Luma Inverted".
Now, all the WHITE parts are CUT, while all the BLACK parts stay. The expression we set for "Evolution" will now move the black and white areas around.
Problem now is that we have an empty background. We need to fix that.

Head into the project panel and bring in the "SOURCE" comp we made before. Drop it BELOW the Interfered layer.
Without setting a Track Matte, we can already see that it's working pretty well. However, we'd face problems if, say, our MOVE setting earlier was higher, thus moving the interfere further, which in turn would make the original visible in places where it should be invisible.

So at this point, duplicate the fractal from above and move it ABOVE the source layer. Set the Source layer's trackmatte to "Luma Matte", the opposite of the first, and now we're good!

I like the streak-ish lines I'm getting at the top there.
STEP 5: Layer 2
-Okay, as cool as what we've done was, it's still looking boring. So, let's make things interesting by interfering AGAIN!
-Select ALL layers and pre-compose. Name the pre-comp "Interfere Again" or something suitable for you.
-Apply INTERFERE again with RGB. (see Step 2 if you forgot).
Apply settings as follows:
-Interfere (remove keys) 4, Freq 5.
-MOVE Horizontal only.
-DISTORT Square (2) 90 degrees (fixed), Width 21. 5 on amount (v2 only)
-SCALE. Default
-ROTATE. 5 degrees
-SYNC Rotate (v2 only).

Cool! Not only do we have a residual Interfere, we also have something to animate.
Usually I'd say we precompose here, but I"m not up for it. We're at the last stage, I think we can get away with it.
STEP 6: ANIMATE
STEP 6a: THE LAYER
For those of you saying "technically, we have already animated", down with you! I mean adding keyframes!
I like to add the Interfere keyframes last due to render/preview times. So I'll do the position stuff first.
We're going to use a new Null here. Parent all three layers to it and name the Null "MOVER".
-Hit "P" to show the layer's position. Click on the Stopwatch at 0:00 to get started.
-Right-click on the keyframe and click "Toggle Hold Keyframe".
This will turn all future layers into Hold Keyframes, which basically mean NO interpolation.
This means that we no longer have to see animation in twos. It's important to remember that.

Move the time down a few frames then move the Null object. A box keyframe will appear. this is okay.
Do this a few more times. Ensure the keys are about 5 or so frames apart. When adding the last keyframe, right click "position" and click "reset" to make sure the layer is in the center of the comp.

This is for our IN animation. Mine takes about 1 and a half seconds. I'll have it hold for 1.5 seconds before OUT animation, just for this demo. So that'll be at 3 seconds. So I'll move the time there then throw my layer around for another few times.
Feel free to use more if you like, or even adding hold keyframes to Scale or Rotate. RAM Preview and see what it looks like. You can also head into the middle and add a few small changes in position. Very slight, just to add a bit more life to that section.
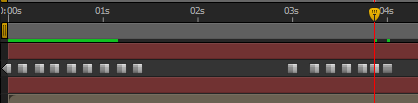
Here's how the position graph looks, incase the boxes are confusing:

Here's how the position graph looks, incase the boxes are confusing:

The layer moves around quite randomly.
STEP 6b: INTERFERE
Now for INTERFERE.
Set the time at one of the last keyframes of the IN animation and click on the Stopwatch for Interfere. Now, move back to the first key and set Interfere to 100. This will throw everyone around.
As the two interpolate, we'll get a nice animation.
At the OUT animation, set the time to the second key and click on the INTERFERE diamond (far left) to add a keyframe, then move the time to the last key and set 100 again.
STEP 6c: TRANSITION
We need a fade-in or OUT transition. For the example I used a gradient wipe. You can use a black solid fade in or such,timed to work best with the other layers' animations.
STEP 7: GET DETAIL
Head into the "Interfered" comp that holds the dirty phase, that we made in early steps. Add other layers above like an Adjustment with Noise, Mosaic, and such effects, to increase the effect. You can also add a glow to the last comp.
As far as the tut goes! That's it!! Hope you enjoyed, hope you learnt something new!