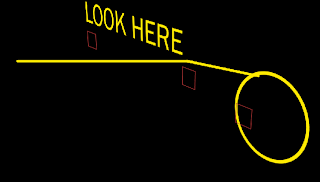
In the previous post we learnt how to join points with a line using the Beam effect and a very basic expression. In this tutorial, we're going to look at how to enable this to work with parented Null objects, since things appeared to get weird when we did that.
From where we left of in the previous post, we'll continue on to tweak the expressions we used. First off, this is not a problem I faced while making the Mission Briefing video, but I thought it'd be good to show the process, because it's pretty cool to look at. Also, things will get a bit technical so prepare for the learnings. There's also gonna be quite a bit of expressions, so if you're still new to expressions, do check out my ebook here: AE Expressions Basics, Oh yea, and a bit of math, so be prepared!
We could start by deleting any and all keyframes created. Let's not have animation bothering us. (You could also duplicate (Ctrl+D) the comp in the project window and use this new copy to mess around).
So, we can initially start with the parenting problem.
If you have probably tried, the best option to make this animation even simpler would be to parent "MIDDLE" and "END" to the text (so they follow the text), and parent "START" to the Circle. This way we won't have to worry about the Null's keyframes as we re-animate and also makes adding new keyframes easier (at least position keyframes).
So, let's go ahead and do that:
Yes, this does indeed look very strange. Why is this happening?
PARENTING PROBLEMS
There's lots of potential puns from that title, but there's no time for that!
We all know that position arrays in After Effects are defined as the position of the object from the composition's top-left corner. So a position value of [20,40] means the object is 20 pixels right and 40 pixels down from the reference point (top-left edge of the comp). The same goes for Z axis being the center of the 3D world.
When you parent a layer to another, things change. The position is no longer from the top-left reference, but now refers to the position of the child layer in relation to the Parent layer's position! So if we have a layer called "One" at [20,40] and another called "Two" at [30,100], then we parented "Two" to "One", then "Two" would now show position values of [10,60], which is essentially the difference between the two, and now means that "Two" is 10 pixels to the right and 60 pixels down from the parent!
In the above image, you can see the effects of parenting. Keep in mind that "RED" has not changed position, even though it's position values have changed.
THE SOLUTION
So from the explanation in the previous paragraph, it's pretty obvious what we need to do to the expression in order to get it working, falling back to simple algebra from school.
Consider a flat road. Point A to Point B is 70. Point A to Point C is 100. BEAM was once receiving a value of 100 (point A-C) but is now receiving 30 (point B-C). How would we fix this? Well, Point A-B plus Point B-C would give the same answer of 100...
 |
| As simple an example as this may be, this is actually how I figured out the expression below! |
So we could go into "FINISH BEAM" and enter it's Start Point (which refers to the MIDDLE Null, which in turn is parented to the text) and type in:
thisComp.layer("LOOK HERE").position+thisComp.layer("MIDDLE").positionThe position of "MIDDLE" is being measured from "LOOK HERE", and look here from the top-left edge. So if we add the two, we get the position of "MIDDLE" from the top-left edge! Makes sense? I hope so!
Alternatively, we could make things a tad more interesting and type:
ref=thisComp.layer("MIDDLE");The ".parent.position" added at the end of the first part is telling AE to look at the parent's position. This allows us to easily copy-paste the expression to another effect without having too much to change.
ref.parent.position+ref.position
This also means that we could throw in a Layer Control, but that's another story.
So we have all our parenting down, all we need to do now is animate the position of the text, and the position of the circle layer, and the Nulls will follow them without a problem. We can also still animate the Nulls in case of anything.
BUT WAIT... THERE'S MORE
What would happen if we wanted to add a third dimension? Let's make the Nulls, the text and the circle 3D. We can leave the beam layers flat for a moment! Nothing really seems to have changed, right? Well, create a new camera and use the Camera Tool (C) to move the camera around!
DANGIT!
Okay sure, we could make the beam layers 3D, however that's not what I wanna go for, because as we go sideways they would become flat :-S So in the next and final part, we'll look at how to make the lines stick to the Nulls when the Nulls are in 3D space and the beam layers are still 2D, and also keep our Parenting!
See you then!!
What do you think? Drop a comment below, or like and comment on the Facebook page


