
When you're working in the timeline of a specific composition, you can sometimes find yourself with hundreds of layers, including pre-comps. Managing these can be difficult, so in this post I'll introduce you to three solutions to help keep stuff organised, which in turn makes your workflow a lot faster and smoother.
Shy Switch
A bit of a tongue twister, shy is the ability to hide layers from the timeline, but still have them visible in the viewer.
Shy is found among the "Comp Buttons" at the top of the timeline:

Okay, but like every other button in the top row, you have to switch on the switch for the layer.
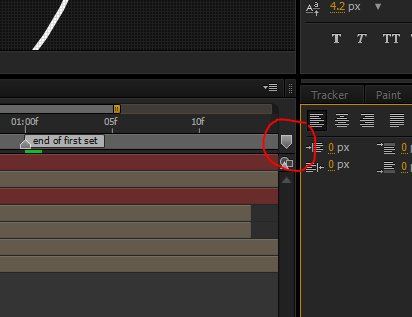
So here's my composition with a mere 7 layers:

The circled area is the Shy Switch for those layers. By switching this on, then switching on the switch for the comp, that layer will be hidden from the timeline, but still be visible in the comp.
I switched it on for layers 1 and 3. Look what happens when I hit Shy at the top:

As you can see, 1 and 3 are no longer visible, but they're still around. Looking at the layer numbers, you can see they're still being taken into account.
Shy is handy when you need to temporarily hide a bunch of layers for whatever reason. In this case it's not very enticing, but some day, you'll see :-D
Markers
Markers are EXTREMELY handy. They relate to time, and can be used not only as a reference, but also as markers for chapters when exporting to flash/encore.

Above, you can see Layer Markers and Comp Markers at work.
These are especially useful for pipeline work. You can put markers like "Track from Here" or "Roto from here", or even "Edit this Pre-Comp". I usually have a "Reference Frame" marker, which I use to let me know from what frame I started motion tracking.
Applying Layer Marker
To add Layer Markers, you can press * (asterik) on the Numpad, or go Layer > Add Marker.
The marker will be added at the current time.

Adding Comp Marker
Comp Markers also has two methods, though neither involves a menu.
The first is to use Shift+Number Key. By Number Key, I refer to the 10 numbers at the top of the keyboard below the function keys (0-9). The marker will be added to the current time.
The second method is to click and drag from the Comp marker bin at the far right side of the timeline:
Whichever method is entirely up to you.
Remember that holding down Shift will snap anything. So if you set a marker, you can drag keyframes and layers while holding Shift to snap them to the markers' time. Sweet!
Renaming
To rename a layer marker, double-click it and change the "Comment" section. Check out what other options you have to tweak. Duration looks interesting:

Expressions
If you're interested in using markers with expressions, here's the syntax:
marker.key(index)
or
marker.key("name")
If you'd like to refer to their time (I don't see any other use), you can use:
marker.key("name").time
Awesome!
Layer Colors
Layer Colors do exactly that: colorize layers. They affect the color of the layer in the timeline section.
By default, After Effects colorizes layers by what they are. Pre-comps are "Sandstone", solids and nulls "Red", shapes "Blue" and so on.
Starting from CS5, we now have colors for items in the Projects panel.
Colors can be changed by clicking on the box to the left of the layer's index number:

I changed layer 7's color to Brown. Notice that the bar in the timeline has also changed color.
This is useful especially when working with very very many layers. I use it to colorize different shots, for example, all side-shots Brown, all front-shots Green. etc
Another advantage, other than easy reference, is that you can Search. In my case, I can go into the Search Bar and with no layer selected, type in Brown, only Brown layers will show up:

if you'd like to change the default colors of layer types (as mentioned above) you can do so by going to Edit > Preferences > Labels

You can even change the funny labelling. I can never really picture "Sea Foam" until I click it.
Though you probably won't use this as often, it's good to know :-P
Well, that's it for Shy, Markers and Layer Colors!

Do you use Shy, Markers or Layer Colors? Drop a comment below and let's know!