Cinema4D works great with Adobe After Effects, and in this tutorial, I'll be showing you a handy workflow for working with multipasses and After Effects. This is Part 01 of 03.
Multipass Rendering is when you render every property of a render separately. Namely, you can have the shadows, speculars, reflections, refractions and colors in separate images. That way, you can bring them all back in After Effects and create the final image (or beauty pass). This is handy for a number of reasons. For one, you can change the color of, say, the shadows. Make them slightly blue or even make them less opaque. You can even render out lights separately, which means you can even change the color of a light, or even switch it off completely!
This make life easier in one obvious case: you can do all this without having to re-render your scene!
Now, there's all sorts of ways to work with multi-pass files. In this series, I'm going to show you how I do it. It's not necessarily the best way, neither is it the fastest, but it's what works for me :-D
All right, having said that, let's get to it.
STEP 1: THE PROJECT FILE
Okay, for starters, you can download the project file below:
Next, let's take a look at the scene we're working with:
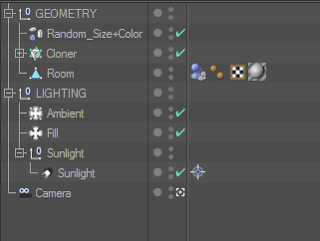
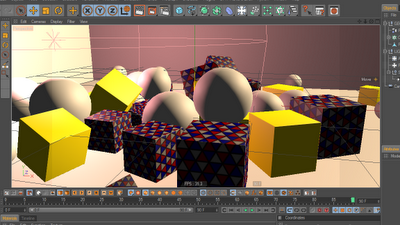
We have a bunch of spheres and cubes being cloned. There's a Random effector that's randomizing their scales and colors. There's a room that holds all the objects and 3 lights: Ambient, Fill and Sunlight. Sunlight is outside, shining light into the room through some openings. Fill is on the left side of the camera, and ambient is there to fake Global Illumination.
Finally, the camera.
Take a moment to check out the materials as well.
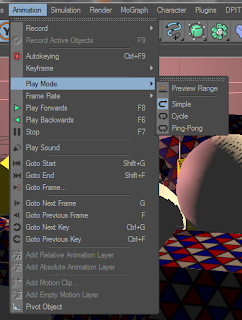
So, when you start, you have all the objects floating. You can go ahead and select Animation > Play Mode > Simple.
I like to do this when working with dynamics. This will keep the playback from looping, which is handy since we only want to render the last frame when the dynamics have settled.
So, press play and let it reach the end, notice it stops and all our objects are scattered across the room.
Note that dynamics vary from computer to computer, so your end result may not be EXACTLY like mine, but that's not important.
STEP 2: Render Settings
Okay, let's go ahead and setup the render for multipass. Head over to Render > Render Settings.
Now, you'll find the usual settings, but right below Save, you'll see Multi-Pass. Check the box!
Don't get excited just yet! All we've told C4D is that we want to use multipass, but we haven't told it which passes to render.
At the very bottom of this box, you have two buttons: Effect and Multi-Pass. Click on Multi-Pass and you'll get a long list of possible passes:
Cool!
Okay, so we're just getting started. So, let's take a look at some of the essentials for the very basic compositing: Specular, Diffuse, Shadow.
That's it!
So go ahead and add them.
Cool beans!
STEP 3: Rendering Previews
Now, we can render in Picture Viewer and see what we've got. If you have "Save" switched on, the renders will go to the same location as the project file (so switch it off if you don't want to save just yet).
Okay, mine's done rendering, but doesn't look like anything's happened. Well, that's because we're currently looking at the beauty pass, which is the standard renders we see in the Picture Viewer, we're not in Multi-pass mode yet.
To the right, above the images, you'll see a bunch of buttons that you probably never noticed before (I know I didn't). Click the "Layers" button.
So, we've now gone into something that looks very similar to Photoshop's Layers pallet. We have an Opacity slider and a Blend Mode selector to the right of it.
Above that, you'll see three radio buttons. As you can see, we're in Image mode. Let's switch over to "Single Pass" for a moment and view each pass separately:
Shadow > Specular > Diffuse above
Cool! As you can see, everything's been separated nicely. This is how multipass works.
You can now switch the radio button to "Multipass", this will now show the three images combined.
You can now switch different layers ON/OFF or play with their opacity to see what sort of control you gain from multipass.
You'll sometimes get weird edges around objects coming from the shadow pass. This is an artifact. You could try switching on "Shadow Correction" or using Ambient Occlusion usually resolves this, though.
You can take a few moments to select each individual channel and see what blend mode is being used.
Usually, we have Diffuse at the bottom, followed by Specular set to Add, then Shadows set to Multiply.
This order and the blend modes is very important to achieve the beauty pass.
So we have three lights in the scene, and you've probably noticed above that all their shadows and speculars are combined. So what if we could separate each light to it's own set of Diffuse, Specular and Shadow? Well, we can!
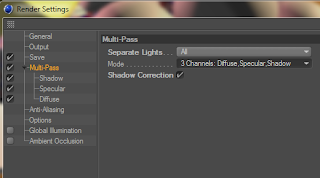
Head back into the Render Settings and under Multipass you'll find an option: Separate Lights.
STEP 4: Compositing Help
You can take a few moments to select each individual channel and see what blend mode is being used.
Usually, we have Diffuse at the bottom, followed by Specular set to Add, then Shadows set to Multiply.
This order and the blend modes is very important to achieve the beauty pass.
STEP 5: Separating Lights
So we have three lights in the scene, and you've probably noticed above that all their shadows and speculars are combined. So what if we could separate each light to it's own set of Diffuse, Specular and Shadow? Well, we can!
Head back into the Render Settings and under Multipass you'll find an option: Separate Lights.
I've currently selected 3 channels. The other options usually merges the channels for you. The choice depends entirely on your workflow. Personally, I always choose 3 channels.
Okay, let's render to picture viewer and see what we get:
Cool! Now we have three folders representing each light, named by what light it is.
By switching the folder's visibility on/off, it's just like switching the actual light on or off. What's the advantage? We're toggling lights without having to re-render the entire scene! We can switch off a specific light's shadows or switch of another light's specular! I'm sure if you threw this into AE, you could use a simple technique to even change the color of a light entirely!
 |
| Fill light alone |
While we're here, I'd like to point something out. Take a look at the Shadow, Specular and Diffuse channels. They're completely dark!
This is because we've separated the lights. If we used the option to only separate specific lights, their information would be saved here. So keep in mind that when separating all lights, switch off the other three channels in the multipass to avoid creating unnecessary files.
Cool!
At this point, you should go ahead and try rendering out different passes. Try adding transparency and refraction, reflections, Ambient Occlusion and see how they work!
That's it for this post. In the next one, we'll talk about setting up an animated render and bringing it together in After Effects.
If you have any questions, don't hesitate to ask :-D


